 Advanced Simulation

One of the benefits of doing simulations, is that it is easy to change various parameters to assess their influence on results. When doing this, often the same post-processing is needed for more than one analysis. Of course you can manually open each .odb, create the right images and save them, but this can be quite a lot of (boring!) work and the chance of making a mistake is definitely there. Therefore, it is often beneficial (and more fun) to create a script to do this automatically. In this blog, I will show how you can create a script to automate the creation of images using Abaqus.
Creating Output Once
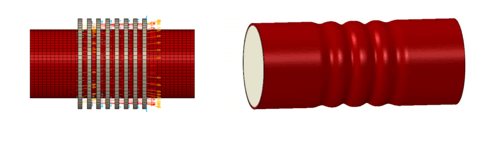
Abaqus stores everything that is done in the CAE in a replay file. This is a good starting point to create a script. The first step towards creating a script is therefore to open Abaqus/CAE and do whatever needs to be automated there. In this case, I will create and save some images. As example files, I use 4 beams with different mesh densities. They are created using python scripting. The image I save involves 3 viewports with different outputs and views (Figure 1).

Figure 1: Example of output will be saved for each simulation.
Once the required image is printed from Abaqus/CAE, Abaqus/CAE can be closed.
Renaming Replay File
As said before, everything that is done in the CAE is stored in a reply file. This replay file is located in the directory from which Abaqus is started. If Abaqus is started from a shortcut, then you can find the replay file in the initial working directory. It is called abaqus.rpy. In some cases, more than one version exists. In that case you will probably needed the newest one. Right-clicking the file allows you to save it under a new name, so it can be used later. In this case I'll call it createViewports.py.
Modifying Replay File
If Abaqus/CAE is started again and the script is run, it will reproduce what was done manually before: the same image will be printed to a file, for the same .odb. That's not our aim: we want to have the same image, but for different .odb's. The replay file must be modified to do this.
Abaqus PDE
This can be done in the Abaqus Python Development Environment (PDE), which can be accessed from the CAE via file --> Abaqus PDE. The PDE (Figure 2) can be used to write and run Abaqus scripts. It has features such as syntax coloring and debugging options to make this easier.

Figure 2: Abaqus PDE.
Via File --> Open the replay file, now named createViewports.py, can be opened.
Comments
Some lines are blue and start with a #: these are comments and don't influence the code.
Import Statements
The non-blue part of the file starts with several import statements, such as
from abaqus import *
These are required to make Abaqus specific python code available within the script.
Viewport-related Statements
After this, there are many commands starting with session.viewports. These create the viewports, specify their size and what is contained in them. Some of these commands may be redundant, if different settings were tried before settling on the final choice of how the image should look. Because it isn't really a problem to redo the initial 'wrong' versions as well, these statements will be left as they are. They can always be cleaned up later.
ODB-related Statements
There is also a statement specifying the .odb to be opened, in my case:
o1 = session.openOdb(name=filepath)
with filepath the odb, including it's path, in between ' ' (to make it a string). To change the .odb for which the images are made, this statement needs to be changed, as well as all other references to the .odb. In this case, I specify a variable called
myOdbLocation = filepath
at the start of the file, and use the replace function (available from the edit menu) to replace all occurences of filepath with myOdbLocation (except in the definition of myOdbLocation). If filepath is not modified compared to the original openOdb statement, then running the script now will still give the same result, but changing the .odb has become a lot easier. As a test, the script can be run with the original odb-location, or a modified one. Save the script and press the play button to do so.
Print-related Statement
With this modification, the .odb can easily be specified, but the image is always printed to the same file, overwriting any previous results. This is not wanted. The print statement therefore needs to be modified as well. In this case it is:
session.printToFile(
fileName=filepathImage,
format=PNG, canvasObjects=(session.viewports['Viewport: 1'],
session.viewports['Viewport: 3'], session.viewports['Viewport: 2']))
with filepathImage the image, including it's path, in between ' '. It's straightforward to define a myImageLocation analogous to myOdbLocation. Both can then be manually modified if a different .odb is to be used. A better solution would be to use the name of the .odb to define the name of the image.
The code could then look something like this:
myName = filename
myLocation = path
myOdbLocation = myLocation+ myName + '.odb'
myImageLocation = myLocation+ myName + '.png'
Here filename is the name of the odb, without path or extension and myLocation is the path (as a string). With these modifications, we can fill in myName manually, and click to run the script and obtain the image, stored under the same name as the .odb.
Loop Over Output Databases
This already spares a lot of work, but to make things more user friendly, we need to be able to loop over different output databases so it's not necessary to manually fill in different values for myName. This can be done using a for-loop. The syntax in python is:
for variable in list:
statements
continuation
Note that the statements inside the loop should be indented by an arbitrary but consistent amount. The loop is ended by ending the indentation.
One way of using this, is to first make a list of all the names for which we want to run the script. This would lead to a script, such as:
filenames = ['elSize5d0', 'elSize2d5', 'elSize1d0', 'elSize0d5']
for myName in filenames:
all other statements, indented
continuation of statements
end of indentation
If the files were created by another script (as is the case here) then they will probably have an organized name and creating a list of filenames will likely be straightforward.
When having many files with unorganized names, creating a list of filenames can be cumbersome. In this case it may make sense to loop over all files in a directory, and select the appropriate ones.
import os
myLocation = path
for filename in os.listdir(myLocation):
if filename.endswith(".odb"):
myName=os.path.splitext(filename)[0]
myOdbLocation = myLocation+ myName + '.odb'
myImageLocation = myLocation+myName + '.png'
all other statements, indented
continuation of statements
end of all indentation
os needs to be imported to be able to use the listdir method, that lists all files in a directory. This directory is specified as myLocation here. The for-loop loops over all files, the if-statement checks whether the current file is an .odb. The output of os.path.splitext(filename) consists of two components: the 0th entry is the name of the file itself, the 1st entry is the file extension. The 0th is selected here, for consistency with previous versions of this script.
Output
Once all modifications are made to the script, it can be run, from the PDE or from the CAE (file --> run script). The results are shown in Figure 3.


Figure 3: Automatically created output for beam with different mesh sizes.
For these four files, it may have been faster to make the images manually. However, if a small change needs to be made, for example if the legend should be formatted differently, it will be much faster to make the change to the script and rerun it than to create the images again manually from scratch.
Conclusion
So, in summary, I have shown that automating postprocessing doesn't have to be difficult. By adding/changing a few lines of code to the replay file, it is possible to automatically create images in Abaqus. In this case, the only modifications were replacing the filepaths for the .odb and the .png, adding 7 lines of code and changing the indentation.
Get Training to Do It Yourself?
Do you want to learn more about using python to automate tasks? Please contact us if you are interested in scripting training.