Some time ago we posted a blog on How to submit and monitor Abaqus jobs through command window. I would now like to revisit this subject, go into a few additional commands and options, including different Abaqus versions and the findkeyword and fetch utilities, and look in a bit more detail to the abaqus commands
The Basics: Opening Abaqus/CAE
Let’s start with the basics. The simplest task to do from the command line in windows, is simply opening Abaqus/CAE. To do this, first open a command window. This can be done by searching for ‘cmd’ in windows (Figure 1) or selecting ‘command prompt’ from the list of programs (Figure 2).
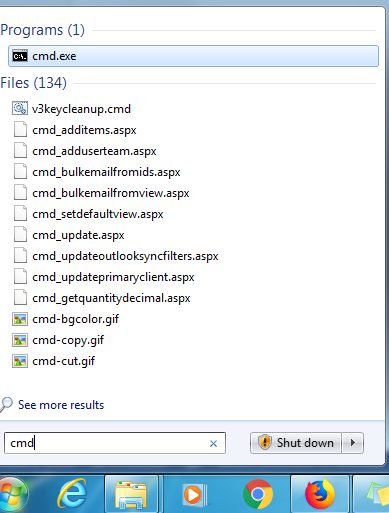
Figure 1: Opening a command window by searching for cmd in windows.

Figure 2: Opening the command line interface by selecting Command Prompt.
In the black screen that appears, commands can be entered. They are then executed in the current directory, which is shown on the line (Figure 3). In this case, we will enter abaqus cae as command and press ‘enter’. We then get the feedback that licenses are checked out, and Abaqus/CAE is started.
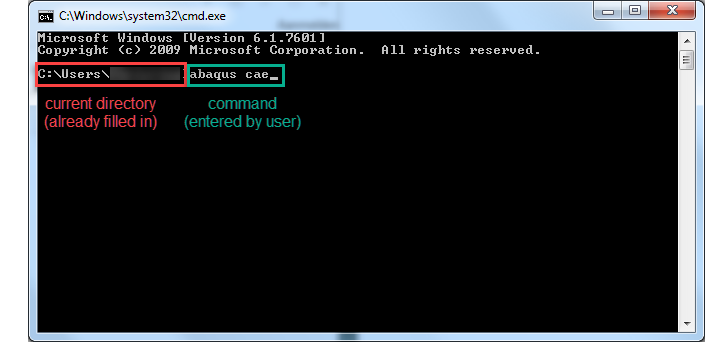
Figure 3: Starting Abaqus/CAE from the command line.
Starting Abaqus/CAE from a different directory
So why would we go through the hassle of starting up Abaqus from the command line, if we can open Abaqus/CAE directly from Windows with less clicks/keyboard entries?
One of the things that I like about this approach, is that the Abaqus work directory (the location where all job files are stored) matches the directory from which Abaqus is started. In the above example, the current directory of the command line interface is my home directory. This can be changed to the folder that you want to use as work directory using the cd command (change directory). It isn’t possible to paste using CTRL+V, but right-clicking does give a paste option and pressing tab gives automatic continuation; pressing it multiple times shows multiple options. However, I usually find it easier to shift right-click on or in the I want to use as work directory and select ‘Open command window here’ (Figure 4).
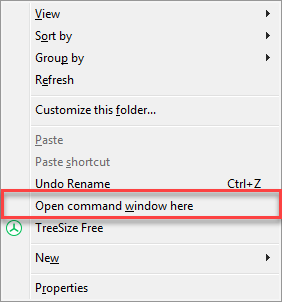
Figure 4: Open command window in selected folder.
Typing in abaqus cae now, will result in Abaqus opening with the current directory as work directory.
Opening a Different Abaqus Version
I have different versions of Abaqus on my system, and sometimes I want to use a specific version. By default, the abaqus command will be installed in such a way, that it refers to the newest version of Abaqus. When typing in abaqus a .bat file called ‘abaqus.bat’ is run. This is normally located in C:\SIMULIA\Commands. This can be opened with a text editor to view its contents (Figure 5).

Figure 5: The contents of abaqus.bat.
In this example, abaqus.bat refers to abq2019.bat. This means that when I use the command abaqus it will run abq2019.bat and therefore Abaqus 2019 will be run. If different versions of Abaqus are installed on a system, then each will have its own .bat file. Starting from Abaqus 2016, their default name is abqxxxxhfy with xxxx the year of the Abaqus release and y the hotfix number. For a general release version no reference to a hotfix is included, so if you want to run abaqus 2018 (general release), the command will be abq2018 and for abaqus 2017 hotfix 3 the command will be abq2017hf3. Abaqus versions before Abaqus 2016 are referred to by version number. For example, Abaqus 6.14-1 is referred to as abq6141. It is usually straight forward to find the correct Abaqus command by looking in the C:\SIMULIA\Commands directory.
These commands work in the same way as the general abaqus command, so if we want to open the CAE of Abaqus 2018 (and it is installed) we can thus type in the following in the command line interface: abq2018 cae.
If I would always want to use Abaqus 2018 instead of Abaqus 2019, I could change abq2019 in the abaqus.bat file to abq2018, and this change would be made.
In the same commands folder, there is also a abq_cae_open.bat and an abq_odb_open.bat. By default they refer to abaqus.bat, so the same Abaqus version is used when opening a .cae or .odb by double-clicking as is used in the command line interface. These files can be changed however.
Version Compatibility
Abaqus .cae and .odb files are version specific. They can be opened using a different hotfix from the same release, but they can’t be used in a different release version. An .odb or .cae file can be upgraded to be used in a newer version, but it can’t be ‘downgraded’ to be used in an older version. So once you go from e.g. Abaqus 2018 to Abaqus 2019 and save the .cae file in Abaqus 2019, it will no longer be possible to open the same .cae in Abaqus 2018. What you can do, is import the .inp file. The model will then be imported with only the mesh and not the geometry, so only limited changes to the geometry are possible. Most other settings will be present and modifiable however.
Selecting a Database to Open While Opening Abaqus/CAE
Since it is not possible to go back to an older version once a .cae file has been upgraded, it may be preferable to stick with a previous version for some .cae’s, for example when working with a colleague who only has an older version. In this case, you may want to open an existing .cae in a different version from Abaqus than the one typically used when double-clicking it. You can of course open the correct version of Abaqus and then select the model that is to be opened and change the work directory, but it may be fast to do this from the command line as follows:
- Open a command window in the directory containing the .cae file, e.g. by shift-right clicking the folder containing it and then selecting: open command window here
- Give the command for the abaqus version that is to be used, followed by cae database= and then the name of the .cae/.odb file. For example, opening and an .odb file named 'test.odb' in Abaqus 2017 can be done with the command: abaqus2017 cae database=test.odb
Running Jobs
If you want to run a job and already have an input file, it is not necessary to open the .cae. An input file named 'test.inp' can be run directly from the command line, using
abaqus job=test
Of course abaqus can be substituted by a specific version if required. There are some additional options for the command. For example, if you are doing a restart (e.g. named previousJob) you need to refer to the job to restart from via oldjob=previousJob. If you would like the output files to be named 'newName', while the input file is named 'oldName.inp', this can be done via:
Abaqus job=newName input=oldName.
To run a job on multiple cores (in this example I’ll use 4), include cpus=4. To only perform a datacheck include datacheck in the command. To run double precision, include double. To see the contents of the .log file on the screen instead of in a file include interactive. This will also have the consequence that it is not possible to enter new commands in the command window until the job is completed. It can thus be used when wanting to run multiple analyses after each other: if a .bat file is created listing with the commands to run different Abaqus jobs interactively on different lines, then they will be run sequentially.
So, if you want to run an input file named oldName.inp, while the outputfiles should be named newName, we want to run it double precision on 4 cores and it should be run interactively, this can be done with the following command (Figure 6):

Figure 6: Running a job from the command line.
An explanation of all options available for running is available in the manual.
Running Scripts
It is also possible to run Abaqus python scripts from the command line. For a script file named script-file.py, this can be done via abaqus python script-file.py if the abaqus kernel is not required.
If the kernel is required and the graphical user interface does not need to be opened, this can be done using abaqus cae noGUI=script-file.py. If the script should be run at the startup of Abaqus/CAE and the graphical user interface should be opened, this can be done via abaqus cae script=script-file.py or abaqus cae startup=script-file.py.
Finding Example Files With Specific Keywords
In some cases, it is nice to have an example .inp file when wanting to use a certain feature for the first time. In such a case it can be helpful to query the keyword/problem database. Abaqus offers the findkeyword utility for this. For example, if you have heard the *SYMMETRIC RESULTS TRANSFER option exists and you would like to see an example, you can fill in
abaqus findkeyword [enter]
A * will then be place on the next line, where you can fill in the keyword you are interested in and press [enter]. Additional keywords can be entered in the same way. Pressing [enter] without filling in a keyword, will let Abaqus search within different databases to find input files containing the specified keyword(s). By default, these are listed on the screen, but they can also be saved in a .dat file (e.g. filename.dat), by including the option job=filename.
An example of this is given in Figure 7.
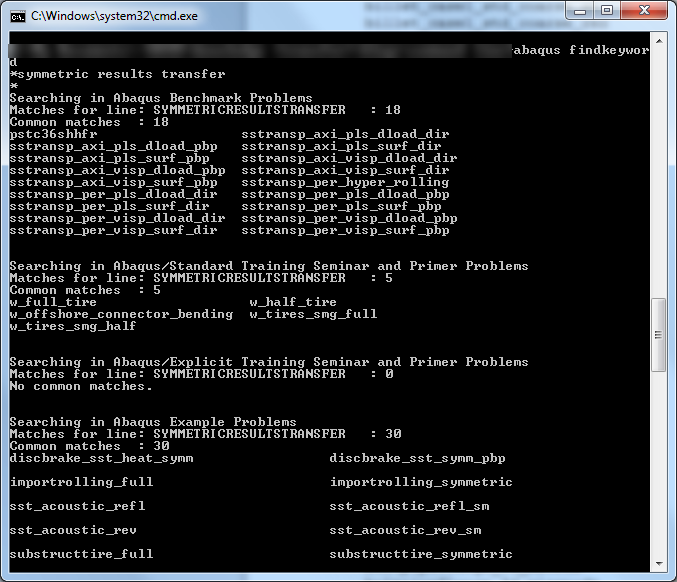
Figure 7: Example of the findkeyword utility.
Fetch
Once you know the name of the file you are interested in via the findkeyword utility, you will want to get it. What I often do is type in the name in the manual to find the .inp file as well as a bit of context explaining why the file was set up. What you could also do is use the fetch utility. If you are interested in the file named tiretransfer_full you could type in what is shown in Figure 8.

Figure 8: Example of using the fetch utility.
All files named tiretransfer_full will then be copied to the directory from which the command was run. It is also possible to use a wild card, for example abaqus fetch job=tiretransfer* will fetch all file starting with tiretransfer (Figure 9).
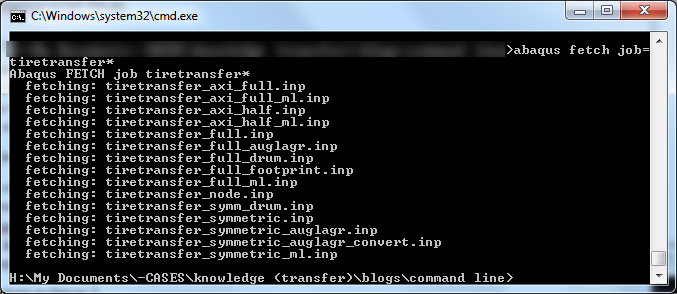
Figure 9: Fetching Abaqus files using a wildcard.
Conclusion
With these examples, I hope you have a better idea of how Abaqus can be run from the command line. There are many more possibilities than the ones discussed here, check out the manual under Abaqus>execution>execution procedures for more information.
Need assistance for your FEA challange?
Request Consulting


