

Posted by Nikolaos Mavrodontis
Table of contents
In this post, we will be highlighting the installation and use of the CAD associative interface for interconnecting Solidworks with Abaqus. By using the CAD interface, geometry modifications performed with Solidworks can be transfered in the Abaqus CAE with a push of a button without the need for manually updating previously assigned boundary conditions or interactions.
Downloading and Saving the Cad Associative Interface
The CAD interface supports interconnection of Abaqus with various CAD software such as CATIA, ProEngineer and Solidworks. For every CAD package, different associative interface files should be used. Please be aware that a dedicated License is needed for this Abaqus Associative Plugin.
In this blog the CAD software to be considered, is Solidworks 2017.
In this blog we assume that Solidworks 2017 is installed and licensed prior to installing the Associative Interface.
The necessary files for the associative interface can be downloaded from software.3ds.com , by selecting the proper Anchillary products package as shown in Figure 1 (shown for abaqus 2018 version).
 Figure 1
When the compressed package mentioned has been downloaded and uncompressed, in a relevant directory (relating to Abaqus Associative interfaces-->Solidworks_2.1_Associative Interface) there should be a relevant dll file (Sw2AbqPlugin.dll). This file should be placed inside a directory where administrator rights are present.
Launching Solidworks and Installing the Interface
Next up, Solidworks should be launched. A file should be opened next (Open--> File) and the selection filter should be changed to Add-ins. Next, the user should navigate to the directory where the respectfull .*dll is installed and double click on it. With this action , shown in Figure 2, Solidworks will install the Associative Interface Add-in.
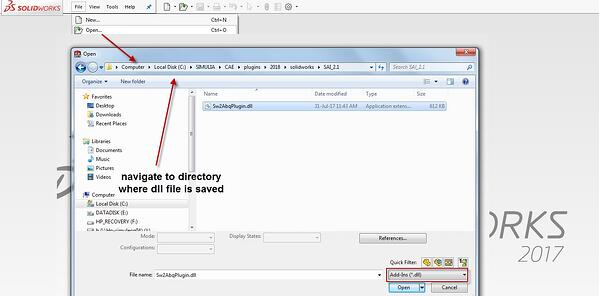 Figure 2
Enabling the Associative Interface
Next up, in Solidworks, the user should go to Tools--> Addins. If the interface installation completed succesfully, there should be an Abaqus/CAE Add in now present in the Addins List. Make sure that this is enabled. This is shown in Figure 3.
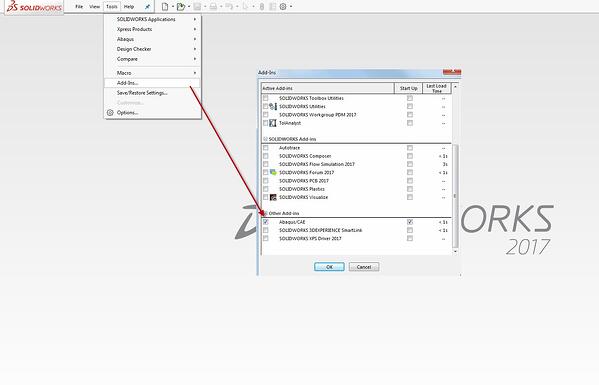 Figure 3
Interconnecting Abaqus CAE and Associative Interface
Next up, the user can launch Abaqus CAE and create a new model database.
The Assembly module should be enabled next. The user should then go to Tools-->CAD interfaces-->Solidworks and Auto assign an enable a port for communication between the two software (abaqus and solidworks) via the Associative Interface. This process is shown in Figure 4.
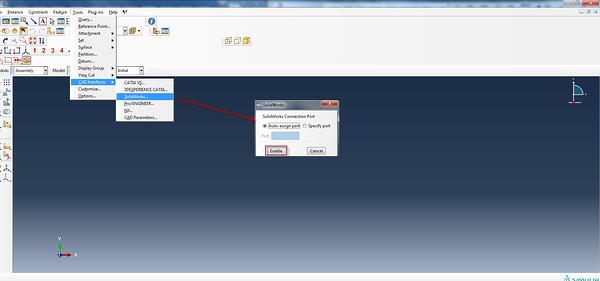 Figure 4
when the connection above is succesfully established, a relevant message will be published in the Message area of the CAE. Next, the user only has to open a solidworks file (parts and assemblies are supported for the interface) and click the Abaqus button shown in Figure 5, in order to import the geometry into CAE.
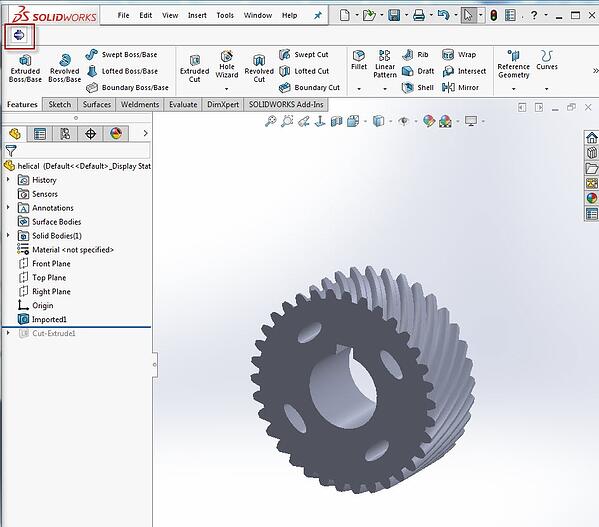 Figure 5
Next, the user can easily proceed with the geometry modificaitions in Solidworks and click the respectful Abaqus button, in order to update the geometry in Abaqus CAE. A relevant video of the Associative Interface in action is shown below.
Last but not least, it is mentioned that whenever the geometry is updated in Abaqus CAE (after clicking the Abaqus button in Solidworks) a relevant message is published in the message Area of Abaqus.
Demo Video


TECHNIA Simulation provides top tier FEA, Non-linear, and Advanced Simulation Software, Training, and Consultancy. Our dedicated team of more than 65 Simulation experts across 16 countries advise and support your innovation with a wealth of specialist knowledge and experience.
About TECHNIA- Related news and articles straight to your inbox
- Hints, tips & how-tos
- Thought leadership articles

Helping you find the information you’re looking for. Discover webinars, events, FAQ's, case studies and tutorials.
VIEW HUB